端末を変えるたびに、Terraformの設定やらAWS CLIの設定やらを整えるのは面倒です。
ということで、Dockerで一撃で環境を作れるようにしてみました。
ソースはココ。
注意事項
ローカルからコマンドだけでクラウドを操作できるのは非常に便利ですが、一方で、セキュリティを意識していないと、非常に危ないです。
最低限、以下の設定はやったほうが良いと思います。
- セキュリティに自信がある方以外は、基本的にIAMユーザで操作した方がが良さげです(IAMユーザにAdministratorAccess権限を付与するのは辞めましょう。。)
- 各ユーザには、MFAを設定すると良さげです(特にルートユーザに)
- ルートユーザにはアクセスキーを割り当てず、IAMユーザに割り当てた方が良さげです
- Terraformなど、外部からアクセスするツールを使わない時は、アクセスキーを無効化あるいは削除しておく良いかもです
- 本記事の内容を実施するには、IAMユーザにAmazonEC2FullAccessを付与すれば、とりあえず実行できます(もちろん自己責任です)
公式のベストプラクティスもあるのですが、相変わらず何言ってるのか分からないので、この辺りを参考にしました。
前提
- Git導入済み
- Docker導入済み
- docker-compose導入済み
要約
ソースはココ。
ディレクトリ構造は以下です。
.
├── .gitignore
├── README.md
├── dockerfiles
│   ├── Dockerfile_terraform
│   └── docker-compose.yml
└── mountpoint
    ├── .aws
    │   ├── config
    │   └── credentials
    └── sample
└── main.tf環境構築は、dockerfiles配下でdocker-compose up -d --buildを実行すればOKです。
AWS CLIの設定ファイルは、mountpoint/.awsを作成し、その配下に配置します。
Terraformの実行は、以下の2通りがあるかと思います。
- コンテナにログインせずに実行する場合
- ローカルの
mountpoint/配下で作業します
docker exec -it terraform /bin/terraform -chdir=sample/ initなどで実行します
- ローカルの
- コンテナにログインして実行する場合
docker exec -it terraform /bin/shでログインmountpoint配下のファイルが同期されているので、そこで作業します
詳細
- まず、任意の場所でcloneを作成します
# clone作成
$ git clone https://github.com/hgssnk/terraform-and-docker.git

# AWS CLI用のディレクトリ作成
mkdir terraform-and-docker/mountpoint/.aws- 次に、
mountpoint/.awsディレクトリにAWS CLIの設定ファイルを作成します- リージョンと、アクセスキーと、シークレットキーを記入します
- 注意事項で述べたように、ユーザ管理や権限周りは十分に気をつけてください
- GitHub等で管理する場合は、
.gitignoreに.awsを記載しておくと良いかと
[default]
region = us-west-2
output = json
[default]
aws_access_key_id=*********************
aws_secret_access_key=*************************これでAWSへのアクセス設定ができました。
次に、Terraformの実行環境を構築します。
# 移動
$ cd terraform-and-docker/dockerfiles

# コンテナ生成
$ docker-compose up -d --build
Building terraform
[+] Building 3.3s (7/7) FINISHED
 => [internal] load build definition from Dockerfile_terraform             0.0s
 => => transferring dockerfile: 395B                                       0.0s
 => [internal] load .dockerignore                                          0.0s
 => => transferring context: 2B                                            0.0s
 => [internal] load metadata for docker.io/hashicorp/terraform:1.3.1       3.2s
 => [auth] hashicorp/terraform:pull token for registry-1.docker.io         0.0s
 => [1/2] FROM docker.io/hashicorp/terraform:1.3.1@sha256:160c8cc975c35e9  0.0s
 => CACHED [2/2] WORKDIR /tmp/terraform                                    0.0s
 => exporting to image                                                     0.0s
 => => exporting layers                                                    0.0s
 => => writing image sha256:364f3a4fc6969058c8c8343abd88fc2f19b6ecfe2a01b  0.0s
 => => naming to docker.io/library/dockerfiles_terraform                   0.0s
Recreating terraform ... done

# コンテナ確認
$ docker ps
CONTAINER ID   IMAGE                   COMMAND                  CREATED          STATUS          PORTS     NAMES
90a93ac58aff   dockerfiles_terraform   "/bin/sh -c 'while :…"   53 seconds ago   Up 53 seconds             terraform
次に、サンプルのTerraformファイルを実行していきます。
(オレゴンリージョンにt2.microのインスタンスを生成します)
# sampleファイルをinit
# AMI IDが変わっていて、実行できないことがあるかもです(リージョンを変更した場合など)
$ docker exec -it terraform /bin/terraform -chdir=sample/ init

Initializing the backend...

Initializing provider plugins...
- Finding latest version of hashicorp/aws...
- Installing hashicorp/aws v4.33.0...
- Installed hashicorp/aws v4.33.0 (signed by HashiCorp)

Terraform has created a lock file .terraform.lock.hcl to record the provider
selections it made above. Include this file in your version control repository
so that Terraform can guarantee to make the same selections by default when
you run "terraform init" in the future.

Terraform has been successfully initialized!

You may now begin working with Terraform. Try running "terraform plan" to see
any changes that are required for your infrastructure. All Terraform commands
should now work.

If you ever set or change modules or backend configuration for Terraform,
rerun this command to reinitialize your working directory. If you forget, other
commands will detect it and remind you to do so if necessary.


# plan実行
$ docker exec -it terraform /bin/terraform -chdir=sample/ plan

Terraform used the selected providers to generate the following execution plan. Resource actions are indicated with the following symbols:
  + create

Terraform will perform the following actions:

  # aws_instance.hoge will be created
  + resource "aws_instance" "hoge" {
      + ami                                  = "ami-08e2d37b6a0129927"
      + arn                                  = (known after apply)
................................ 省略
Plan: 1 to add, 0 to change, 0 to destroy.

────────────────────────────────────────────────────────────────────────────────────────────────────────────────────────────────────────────────────────────────────

Note: You didn't use the -out option to save this plan, so Terraform can't guarantee to take exactly these actions if you run "terraform apply" now.


# apply実行
$ docker exec -it terraform /bin/terraform -chdir=sample/ apply

# aws_instance.hoge:
resource "aws_instance" "hoge" {
    ami                                  = "ami-08e2d37b6a0129927"
    arn                                  = "arn:aws:ec2:us-west-2:293157066816:instance/i-0f5ea121b38a86941"
................................ 省略
インスタンスの生成が出来たようです。
GUIで確認してみます。(サンプルは、EC2のオレゴンリージョン)
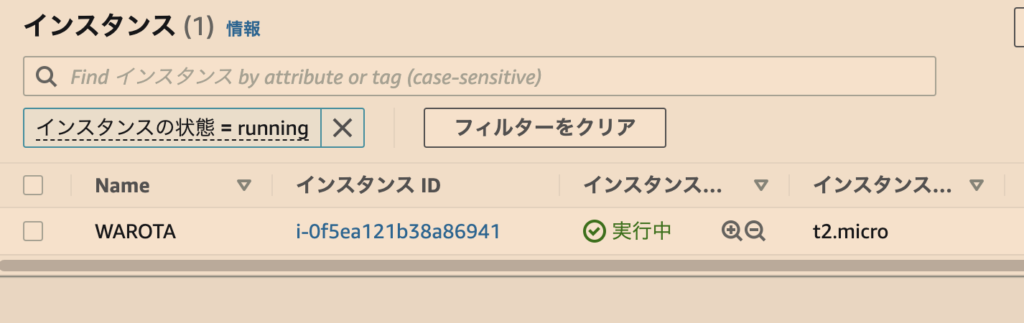
ちゃんとインスタンスが生成されているようです。
では、このインスタンスを廃棄します。
# destroyを実行
$ docker exec -it terraform /bin/terraform -chdir=sample/ destroy

aws_instance.hoge: Refreshing state... [id=i-0f5ea121b38a86941]

Terraform used the selected providers to generate the following execution plan. Resource actions are indicated with the following symbols:
  - destroy

............................... 省略

Plan: 0 to add, 0 to change, 1 to destroy.

Do you really want to destroy all resources?
  Terraform will destroy all your managed infrastructure, as shown above.
  There is no undo. Only 'yes' will be accepted to confirm.

  Enter a value: yes

aws_instance.hoge: Destroying... [id=i-0f5ea121b38a86941]
aws_instance.hoge: Still destroying... [id=i-0f5ea121b38a86941, 10s elapsed]
aws_instance.hoge: Still destroying... [id=i-0f5ea121b38a86941, 20s elapsed]
aws_instance.hoge: Still destroying... [id=i-0f5ea121b38a86941, 30s elapsed]
aws_instance.hoge: Still destroying... [id=i-0f5ea121b38a86941, 40s elapsed]
aws_instance.hoge: Destruction complete after 41s

Destroy complete! Resources: 1 destroyed.
廃棄できたみたいなので、GUIでも確認してみます。

できてますね。
作業が終わったら、Dockerコンテナを廃棄します。
# 起動中のコンテナ確認
$ docker ps
CONTAINER ID   IMAGE                   COMMAND                  CREATED         STATUS         PORTS     NAMES
0a2a94056d3d   dockerfiles_terraform   "/bin/sh -c 'while :…"   2 seconds ago   Up 2 seconds             terraform

# terraformコンテナを廃棄
$ docker rm -f terraform
terraform

# 廃棄確認
$ docker ps -a
CONTAINER ID   IMAGE     COMMAND   CREATED   STATUS    PORTS     NAMES

# 複数のコンテナを全て一気に廃棄する場合は以下(Bashの場合)
$ docker rm -f $(docker ps -qa)
aab12b441eb0コンテナを廃棄してもmountpoint配下は永続化されているため、次にコンテナを生成したときにもう一度続きからできます。
また、Terraformで利用できるパラメタについてですが、こちらに公式ドキュメントがあるみたいです。
例えば、aws_vpcのパラメタは、このページにありました。
最後に
Terraformは、AWSに限らず、色々なクラウドサービスに対応しているみたいです。
つまり、今回のようにコンテナ上で一元管理することで、マルチクラウド環境構築の再現性が高まるかと思います。
汎用性が高いフレームを作ることが出来たので、私としては満足しています。

コメントを残す